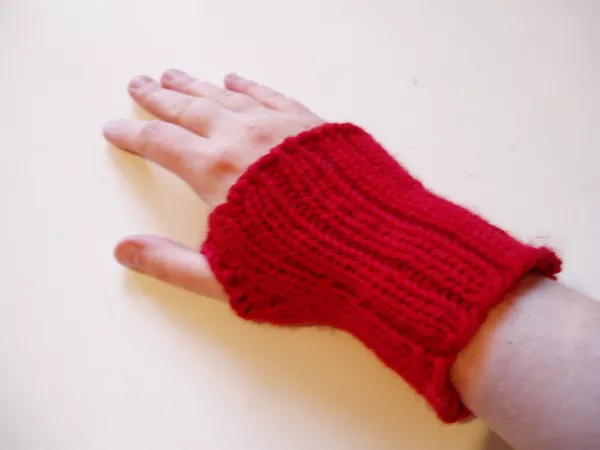
The idea or more accurately the need for this fingerless glove came from Nick, who needed something to replace a mouse mat with. Behold - a design!
Let me present the Infringing Mitt (formerly known as something else - see the comments about the name change (and quite rude corporate pressure.
Note: I offer this mitten pattern for no fee for your own personal use - you may not sell this pattern or the mitts you knit using it (ask me about charity).
Please if you like this pattern do concider taking a look at the products I advertise here on my website and use my links for your Amazon & co purchases - it earns me a small fee to be able to cover the costs of running this blog!
Instructions:
Yarn: You can use any bulky wool, preferrably superwash (won't felt when rubbing against the table) - I used Asa Gjestal Spinneri's Topp'tTå 100% superwash wool in colour red (909). My glove used ca 25 metres (27 yards) of yarn - one ball will make 2 gloves.
Needles: to obtain a tight knitted fabric that will cushion the hand, I knit with 4mm dpns (the yarn calls for 7mms)
Approximate gauge: 18 st x 24 rows in 10 cm (4 in) square when slightly stretched in 2x1 rib. If you get smaller/bigger gauge, just leave out one rib repeat (3 stitches).
Pattern:
CO 33 stitches,
Divide sts between 3 needles, mark beginning of round.
Work for 4 inches in 2x1 rib
Make thumbhole: from beginning of round, k2, knit 5 stitches on scrap yarn, transfer scrap yarn stitches back to the left needle, and knit the stitches again using the actual mitt yarn. Work 4 more rounds as established in 2x1 rib, BO in a stretchy way (I used the decreased bind-off , but didn't knit tbl).
Thumb: pick the thumb stitches on the needles, 6 below and 6 up.
Knit the below 6 st, pick up 2 on the side of the hole, knit the upper 6, pick up 2 on the other side.
Knit 3 rounds (no rib), BO in the same method you bound off the actual mitt part. You're finished! No need for blocking, as the mitt is supposed to be stretchy.
Thanks to Cheryl Niamath's Dashings for inspiration. Please give feedback and comment if the pattern is unclear, or you have anything else to say!
Don't forget to post your finished mitts on Ravelry!
- Log in to post comments
Patent and trademark infringement
We applaud your creativity, however, your use of our product name, and our product design is neither acceptable nor legal. Therefore please remove this pattern from your site. Thank you.
Tana Brinnand
MouseMitt International
www.mousemitt.com
I can't see any trademark infringement
As the pattern is a standard fingerless glove I can't see any problems with the pattern.
Please search Google for "Fingerless Glove" and you might find hundreds of thousands of fingerless gloves which could be used for computer work.
Pattern name changed
I am sorry for the name confusion. This was my mistake; it didn't occur to me to do a search before naming my free pattern.
I hope all readers do understand that I am a private person offering a knitting pattern for free.
Please also note that me and this blog reside in Germany, where the MouseMitt Int'l have no patents over their products.
It should also be said that the patents this company own relate to products constructed quite differently than this pattern (note: not a product, but a pattern) i.e. using padding.
However to avoid further rudeness, unprofessional business communication in the form of intimidating comments and inconvenience I've changed the pattern name and removed notes of its use and purpose.
I wish the MouseMitt Int'l all the best, and that my pattern be of good use to the readers looking for a mitten to knit.
Just one word my dear:
Just one word my dear: "Brilliant!" (Have been following the Rav discussion with great interest.)
Pattern Name
You are a refreshing blogging breeze in a litigious cesspool of a society. Thanks for the free fingerless glove pattern.
LOVE the new name
I saw your commentary on Ravelry. While I think it is silly that anyone would ask you to change the name of your pattern, I adore the name you chose. Cheers to you!!
Thank you for your support
Thank you for your support and the lovely feedback LadyLorien, Diana and Catherine!
Thank you!
We do appreciate your compliance, and wish you the best of luck on your site.
Sincerely,
Tana Brinnand
PS I like the new name too. :-)
We justified couldnt leave
We justified couldnt leave your website before saying that we genuinely enjoyed the high-frequency quality message you offer in support of your visitors... Would be back over again to check up on untrodden stuff you mail!
New name for this wonderful pattern
I'm new to knitting in a real pattern, and yours is really understandable to me, thank you! I have a suggestion on what to call this, in honor of your dignified answer in battle with the Attitudes... how 'bout "Infringemitts"? :-)
I like that! Thanks so much
I like that! Thanks so much for your comment and feedback, that really makes my day!